Bluehost offer free WordPress installation in
exchange of buying hosting via Affiliate links, though many users asked
us to create a blog post on Installing WordPress on Bluehost or similar
hosting, and we will publish installation process of WordPress on
different and popular Webhosting company.
Starting the series with Bluehost, which is one of the top recommended hosting for WordPresss and offers WordPress specialized hosting.
Bluehost offers shared hosting for WordPress bloggers, where they offer
unlimited hosting, unlimited domain, cPanel, One click WordPress
installation, custom script installation, free adwords coupon and
free domain registration for one year. There is no reasons to ignore
Bluehost, when you are looking for a reliable WordPress hosting. Here is
a special Bluehost discount link, which will help you to get special discount on Bluehost Hosting.
So,
I assume you have your domain and hosting purchased from Bluehost and
you have Bluehost login with you. Now, we move ahead with our tutorial
on How to Install WordPress on Bluehost.
Installing WordPress on Bluehost:
If you are accustomed with other cPanel hosting, you will have no problem using Bluehost cPanel,
but if you are new to them, this Step by step tutorial will help you to
get started. If you have purchased domain from somewhere else, you need
to change the NS to point to Bluehost nameservers. I.e:
- ns1.Bluehost.com
- ns2.Bluehost.com
Once,
you have updated the NS and you used the same domain name while
purchasing hosting account from Bluehost, you can simply start with WordPress installation on Bluehost hosting. Login to your Bluehost cPanel account by typing your domain name and password given at the time of sign up.
There are two site builder script offered by Bluehost to Install WordPress: Simple scripts and WordPress.
I will not go into the pros and cons of any of them, as you can use any
of them to get started with WordPress within 5 minutes. For the
simplicity of this tutorial, we will use Simple scripts method to Install WordPress.
Under BH cPanel, click on Simple scripts under Site builder:
Now,
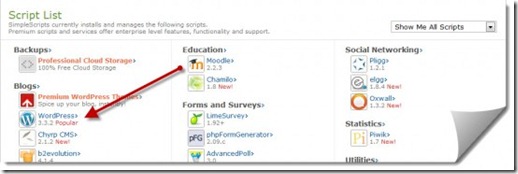
you will get a huge list of blogs and forums, that you can install
using simple-Scripts. Click on WordPress, under Blog section.
As
soon as you click on WordPress, you will be taken to Wp install script
page. There are two options: Install and Import. Click on “Install“.
Setting up Simple scripts for WordPress installation:
Now, we are on the page where we will configure the complete WordPress installation on Bluehost. Let’s understand every step one by one:
WordPress Version:
First field is WordPress version. You can always check the latest WordPress version on official page here.
And by default, you will get the latest WordPress as an option. If you
wish to install an old version of WP, you can simply select the Wp
version from drop down menu.
WordPress Installation directory:
When you are installing WordPress, you get two options to Install Wp on your domain: With www or without www Prefix.
I usually prefer to keep it without www now, as short is always sweet.
There is no SEO advantages or disadvantages of using www or non www.
If
you wish to install blog on sub directory, that is domain.com/Blog,
simply add blog or any other suffix you want to use for your WordPress
blog.
Advance options:
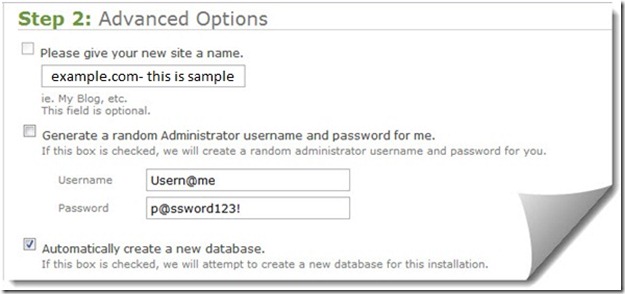
Once you are done with version and Installation path, next is to configure options like WordPress admin login and password.
Other options like Blog name, you can always edit later from Settings
> General under WordPress dashboard. Also remember, by default your
admin Email address is your Bluehost account Email address. (Email
address you used for signup).
Plugins and Themes:
Third option is to install some pre-configures themes and plugins, which I suggest you to uncheck and start from scratch.
I prefer, to keep my WordPress installation as clean as possible and
install only those theme and plugins, which I’m going to use. Wait for
my next tutorial on essential plugins for your blog.
Step 4: License agreement
And
like any other software installation, you just need to agree with
license agreement and click on complete. Within minutes, your WordPress
site will be installed and running on your new bluehost account.
On
the next page, you will see the status of your WordPress installation
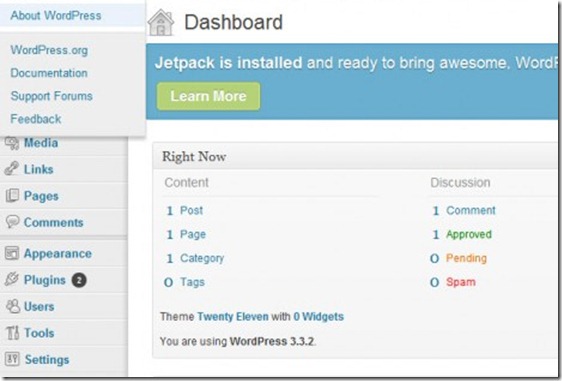
and once it says, complete you can login to your WordPress dashboard by
typing http://domain.com/wp-admin (replace domain.com with actual domain name).
Now,
all you need to do is delete sample posts, comments, change permalink
and configure other essential settings and start blogging on WordPress..
Well,
WordPress is no doubt one of the easiest self hosted blogging platform
for Bloggers. And hosting like Bluehost, makes it easier for non-techie
to get started with in within minutes. In the next article, I will
share list of all basic plugins you should be installing after WordPress installation on Bluehost.


0 comments:
Post a Comment