
Bitchin’ Book Blog consists of tips to help you become a better blogger and have a sleek, professional, and user-friendly website. It is also a collection of WordPress tutorials and code snippets to help enhance your blog. If you have a question about blogging/web design, or want to request a tutorial, you can do so here (it’s completely anonymous)!If you’re a “do it yourself” kind of person, or if you are afraid to move to WordPress but can’t afford to hire someone to do it for you, this post is for you! I’m going to walk you through how to move your blog from Blogger to WordPress step-by-step. There will be plenty of instructions and screenshots. This will be a long post, but I promise that the length is a little deceiving. The process is not that long or that difficult, but the post makes it look long just because I’ve provided tons of screenshots and instructions. Many of the steps only take about 5 seconds, but I still have screenshots to help you out!
If you already have a custom domain name on Blogger, you will have to complete some extra steps. Look for the blue boxes to find the extra steps, like this:
Moving a domain from blogger? Extra Step!
Table of Contents
- Step 1: Buy Web Hosting & a Domain Name
- Step 2: Installing WordPress
- Step 3: Perfecting Your WordPress Installation
- Step 4: Moving Over Pages and Widgets (Gadgets)
- Step 5: Redirect Blogger to WordPress
- Places to get a WordPress theme
- Extra Step: Sorting Through Categories
- Extra Step: Keep All Your Blog Followers
Step 1: Buy Web Hosting & a Domain Name
This walkthrough will show you how to install WordPress using RFE Hosting, but the process may be similar for other web hosts.
To buy your hosting package, visit RFE Hosting’s website and click on the tab marked “Web Hosting” at the top. RFE Hosting offers two different packages: RFE Advanced at $6.95 per month, and RFE Pro at $12.95 per month. The cheaper option—RFE Advanced—should be enough for a book blogger.
Under RFE Advanced, click “Sign-Up”. This will initiate the purchase process. If you need a domain name, make sure you check the option for “I want RFE Hosting to register a new domain for me.” You need a domain name if your current blog URL is http://yourname.blogspot.com. You can enter in any name you like on this page (as long as it’s available). I recommend going with a .com domain.

Step 2: Installing WordPress
You may have to wait a few hours for RFE Hosting to finish setting up your new account. Eventually, you will get an e-mail from RFE Hosting with a long list of instructions and login details. The beginning will look a bit like this:


- Choose Protocol: This is actually optional. By default, it is selected on http:// , but most people seem to prefer http://www. If you prefer having a www, then change the protocol to that.
- Site Name: This is the name of your blog.
- Site Description: This is sort of optional, but you might as well change it. This is a one-line description of your blog. It can be whatever you want. It might not actually appear anywhere on your WordPress site, but again, why not fill it out?
- Admin Username: Whatever you do, do not choose admin for your username. Otherwise, it can be whatever you want. I also recommend against using your exact blog URL. For example, I shouldn’t choose “admin” and I shouldn’t choose “nosegraze” because my site is nosegraze.com. Other options include your real name, or just a standard username you use on other sites.
- Admin Password: This password needs to be STRONG! Do not use dictionary words, do not use your real name, do not use your blog name, do not use “password”. Choose something strong and secure, like CmJ47>w3e(8z. Using a mix of numbers, letters, and symbols is best.
- Admin Email: This is your e-mail address.
- Limit Login Attempts: Checking this box will automatically install a plugin called Limit Login Attempts. It’s a good, simple plugin that will help protect and secure your site!
- Advanced Options: This is a place where you can set backups of your WordPress installation. It’s an excellent idea! For the “Backup Rotation”, 4 is what RFE Hosting recommends. I don’t recommend you set more than 4, because the more backups you have, the more space they take up.
And now we wait…

Moving a domain from blogger? Extra Step!
Step 3: Perfecting Your WordPress Installation
Now is an excellent time to start setting up your WordPress installation to get it just perfect! The very first thing you want to do is navigate to Settings » Permalinks. The default permalink structure is NOT what you want! Unless you already have a custom domain name on Blogger, you can set it to whatever you want because we will be seamlessly redirecting all your posts to the right place later. I personally like the “Post name” option, but most people seem to like the Month and name setting.If you already had a custom domain name on blogger, then you need to select the “Custom” option and enter this: /%year%/%monthnum%/%postname%.html This will ensure that your permalink structure is identical to Blogger’s.

Here are all the plugins that I install by default for people:
- Better WP Security – This plugin will help secure your WordPress installation from hackers! When you install it and go to the settings page (the tab called Security), there should be an option to “Protect from basic attacks” and that will set up all the basic options for you.
- Comment Reply Notification – This plugin will notify your commenters if someone replies to them. Install it, then go to Settings » Comment Reply Notification and set it to “Anyone Replies”.
- CommentLuv – When someone comments, this plugin will add a link to the user’s most recent post! You can configure the settings in Settings » CommentLuv.
- Editorial Calendar – Every book blogger needs this! It adds a new option under the “Posts” tab for a calendar, which shows you a calendar view of all your posts! It’s AMAZING for organizing and scheduling.
- WPtouch Mobile Plugin – This plugin will add a mobile-friendly version of your blog, for when people visit it on mobile devices. Unless you have a responsive theme, this is a must-have because it’s super tedious to browse a “desktop” version of a blog on your phone!
Step 3: Importing Posts and Comments
Now it’s time to get all your posts and comments into WordPress! First, go ahead and delete the default post and comment (the “Welcome to WordPress” ones). Now, let’s get importing!Under the Tools menu, select Import. Then, on that new page, select the top option for importing from Blogger.
A new page will pop up asking you to install the Blogger Importer. Click Install Now.


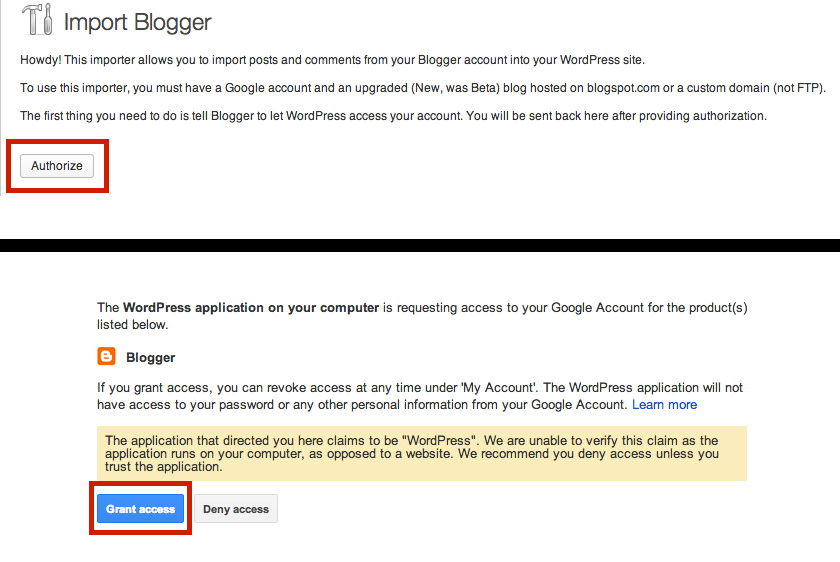
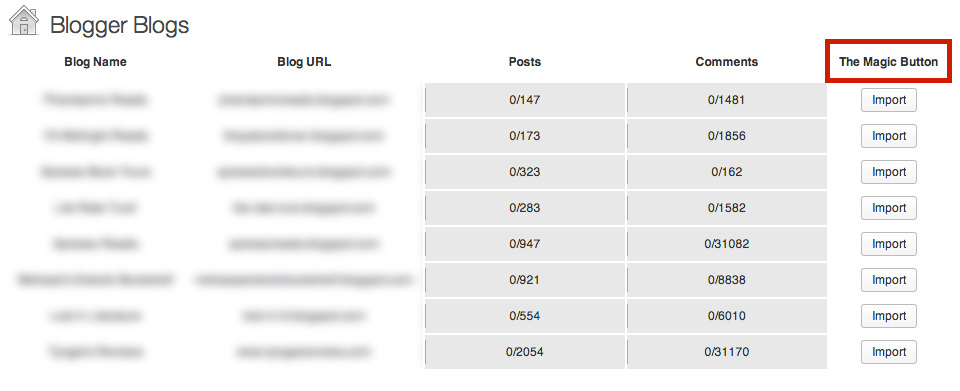
When it’s all finished, you’ll get a button to Set Authors:

If you’re the only author on your blog, you won’t have to do anything other than click Save Changes.

Moving a domain from blogger? Extra Step!
Step 4: Moving Over Pages and Widgets (Gadgets)
The two things that don’t get automatically imported are pages and widgets. You will have to manually move over both of these.Pages
First, create a new page on WordPress for the page you want to move over from Blogger. Give it the same title. Then open Blogger in a new tab and go to that page. Switch to the HTML editor and copy all of the HTML. Then, go back to WordPress. Make sure you switch the text editor to the Text tab (the HTML editor). Then paste in all the HTML.You will have to do this for every single page.
Widgets (Gadgets)
You also have to manually move over widgets. Not all widgets can be moved over. For example, if you use the built-in Blogger page view counter widget you cannot move that over since it’s something built into Blogger. But any widgets that are just text or HTML can be moved over just fine!The process is very similar to pages. Find your Blogger gadget, copy all of the text/HTML, then go to WordPress. Navigate to Appearance » Widgets and drag a new Text widget into your sidebar. Then just paste the HTML in there.
Step 5: Redirect Blogger to WordPress
If you had a custom domain name on Blogger that you moved to WordPress, you can skip this step!
Finally, we’re going to redirect your old Blogger blog to your new
WordPress one! That way, when someone visits any post on your Blogger
blog, they will automatically be redirected to that same post on your
new WordPress blog! Spiffy!To do this, we’re going to install a plugin. Go to Plugins » Add New and search for Blogger to WordPress. Now, there will be a ton of results and it’s very important that you get the right one, which I’ve highlighted below! Make sure it’s the one by rtCamp.
Then activate it, and navigate to Tools » Blogger to WordPress Redirection. Be mindful of the notice at the top that says “Please keep this plugin activated for redirection to work.” So as long as you want your Blogger blog redirecting, do not deactivate the plugin!

To begin, click Start Configuration. The plugin will detect the Blogger blog you imported posts from. Click the Get Code button for that blog. They will give you a big piece of code to add to your Blogger blog. So copy that, then log in to Blogger.


Then, back in WordPress on the plugin page, there should be a button called Verify Configuration. Click that, and it will give you two links. Click on the Blogger link, and if you followed all the steps correctly, it should redirect you to the new post on WordPress!
Congratulations, You’re Done!
That wasn’t so bad, was it? The only thing that’s left to do now is find a theme. On WordPress there are free themes and premium (paid) themes. Generally speaking the premium themes will have a lot more customization options (“you get what you pay for”) but there are also some great free themes available too!Places to get a WordPress theme
- Free WordPress.org Themes Directory (Free themes)
- Creative Whim Themes (Premium themes)
- Elegant Themes (Premium themes)
- Theme Forest (Premium themes)
- WooThemes (Premium themes)
Questions?
If you have any additional questions about the process, just let me know by posting a comment and I’ll do my best to help!Extra, Optional Steps
Extra Step: Sorting Through Categories
Categories, tags, and labels
In Blogger there are Labels, but in WordPress there are Categories and Tags. When you import your posts from Blogger, all of your labels get turned into categories. But, if you want to organize your posts properly, you’ll want to convert some of those categories into tags.I recommend that you read my post about the difference between WordPress categories and tags.
The gist of it is that categories should be the broad sections of your blog. Sections might include: book reviews, blog tours, author interviews, discussions, blog tips, and giveaways. One post can be in multiple categories.
Then, tags are the more specific details about each post. So if you have a post in a Book Reviews category, the tags might be: the book title, the author’s name, the publisher, the genres, and the star rating.
Extra Step: How to convert some categories to tags
In WordPress, navigate to Tools » Import, then select Categories and Tags Converter and install the plugin. On the plugin’s page, you will be shown a list of every single category you have. The categories you select will be converted into tags. Since it’s common to have more tags than categories, I recommend that you Select All and then unselect the ones you want to keep as categories.Then, at the bottom of the page, press the “Convert” button and you’re done!
You can always come back at any time to convert more categories into tags, or to convert some tags back into categories.
Extra Step: Keep All Your Blog Followers
To maintain as many followers as possible, there are a few steps you need to follow for each site.Redirect your Blogger RSS feed
Login to Blogger and navigate to Settings » Other. Look for the box titled Post Feed Redirect URL. You need to put either your FeedBurner URL in that box, or your WordPress feed url ( http://www.yoursite.com/feed ). Either one is fine. (But if you select FeedBurner, you need to update your FeedBurner source URL.)
Change your FeedBurner source feed
Go to FeedBurner’s website, select your feed, and click on Edit Feed Details… at the top. Then you need to edit the Original Feed box and nothing else. Put in your new site URL followed by /feed. So mine would be http://www.nosegraze.com/feed


0 comments:
Post a Comment